The following configuration guidelines are to be used by district/school IT administrators.
In this article you can find step-by-step instructions for setting up and installing the HealthSmart integration with Google Classroom:
- What You Need To Get Started
- Integration Versions
- Setup Instructions for Version 1
- Setup Instructions for Version 2
- Additional Content Control Settings
What You Need To Get Started
- A district/school subscription to the HealthSmart integrated digital edition.
- District/school IT has submitted the Integration Setup Form to ETR and/or scheduled an integration setup call with the ETR Support team.
- District/school IT has confirmed installing either Version 1 or Version 2 of the HealthSmart integration with Google Classroom (details below).
![]() The HealthSmart integration with Google Classroom cannot be installed by individuals or teachers. For questions about the setup, please contact ETR Support.
The HealthSmart integration with Google Classroom cannot be installed by individuals or teachers. For questions about the setup, please contact ETR Support.
Integration Versions
ETR offers two versions of the HealthSmart integration with Google Classroom. Please review the following technical requirements to confirm which version to install.
Version 1: HealthSmart OAuth Integration- Only an IT administrator to your district/school’s Google Workspace for Education account can install the OAuth integration.
- Your district/school uses Google Education Fundamentals (no cost).
- See setup instructions for Version 1
- Only an IT administrator to your district/school’s Google Workspace for Education account can install the Add-On integration.
- Your district/school must be subscribed to Google Education Plus (paid), or must have purchased Google’s Teaching and Learning upgrade and applied it to relevant educators.
- See setup instructions for Version 2
Setup Instructions for Version 1
See the following instructions to begin the setup to the HealthSmart integration for Google Classroom using Google Education Fundamentals (no cost).
Step 1: Confirm Google Administrator Access
You must be a Google Administrator to complete the integration process. To confirm that you're a G Suite Administrator, visit the Google Admin Console. If you are an admin, you will have access to the App Access Control page, see example below:

If you do not see the above page and cannot log into this link with your school Google credentials, you will need to have an administrator with additional privileges perform the integration.
Step 2: Adding the HealthSmart App to the District.
- Login to your Google Workspace Admin Console using your administrator credentials.
- From the Admin Console dashboard, click on Security in the left-side menu. Select the option > Access And Data Control > API controls.

- From the API controls, click on Manage Third Party App Access.

- Select the option, Configure new app.

- In the dialog box, you will be prompted to enter the Client ID for the app. Please use the HealthSmart application with the following Client ID:

- Click on the Search button to find the HealthSmart app.
- Once the app has been authorized, select the HealthSmart application from the list of authorized apps and click on Add.
- In the Add OAuth app control dialog box, select the appropriate access level for the app.
- Click on the Add button to add the app control to the list of authorized apps.
Optional Step: Add ETR to Allow List
Sign in to your Google Admin console using your administrator account.
In the Admin console, go to Menu
Click Account > Domains > Allowlisted domains
Click Add domain
Enter the domains:
www.etr.org
etr.org
healthsmartk12.org
www.healthsmartk12.org
Click Add
Click Save
Once added to the allowlist and you will be able to grant access to apps and services from that domain as needed. It may prompt to for the level of access, select Trust.
Step 3: Test the Integration
ETR will provide a unique launch link connected to the district/school subscription. The launch link authenticates the teacher by logging in to the HealthSmart program website using the teacher's school-assigned Google credentials (see example launch link below).

Test the integration by using a teacher account. The launch link will bring the teacher to the HealthSmart sign-in page for Google Classroom.
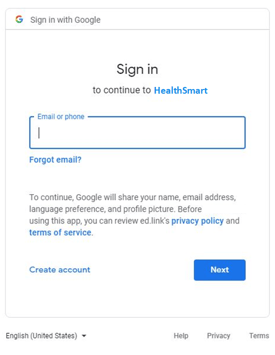
After logging in to Google Classroom, educators are automatically redirected to the HealthSmart website to the welcome page under Lessons. The lower part of the page shows the grade levels of HealthSmart that are included in your subscription.

Step 4: Distribute the Launch Link to Teachers
Each district/school may choose the best way to distribute the launch link to their educators. One option is to distribute the launch link via email with instructions on how to bookmark it in a browser. Another option is to add the launch link to an SSO portal such as Clever or ClassLink by creating a custom link/app.
If the district/school is adding the launch link to a portal such as Clever or ClassLink, please download the following image file to use as the HealthSmart icon:
![]()
Final Confirmation: Congratulations, you’re all set! Please schedule a 10-minute call with us where ETR will create and provide your launch link as well as run a test launch of HealthSmart. This will verify the correct integration setup and initiate the data sync. To schedule the setup call, please contact ETR Support.
📑Notes:
- The HealthSmart integration for Google Classroom is configured for teachers only.
- Students can only access content assigned by a teacher.
- District/school administrators or other staff will need a course in Google Classroom to access the program. Alternatively, admin access to HealthSmart can be created without the need for a course in Google Classroom. To request this option, please contact ETR Support.
Setup Instructions for Version 2
See the following instructions to begin the setup to the HealthSmart integration for Google Classroom using Google Education Plus (paid), or with a purchase of Google’s Teaching and Learning upgrade that has been applied to relevant educators.
Step 1: Confirm Google Administrator Access
You must be a Google Administrator to complete the integration process. To confirm that you're a G Suite Administrator, visit the Google Admin Console, see example below:
If you do not see the above page and cannot log into this link with your school Google credentials, you will need to have an administrator with additional privileges perform the integration.
Step 2: Install the HealthSmart Add-On
- Confirm you are logged in to your Google Workspace Admin Console using your administrator credentials.
- Visit the HealthSmart Add-On page in the Google Marketplace: https://workspace.google.com/marketplace/app/healthsmart/163032669570
- Click to Install the Add-On, then Continue on the popup that appears.
- Choose whether to have HealthSmart available to everyone in Google Classroom or specific groups only.
- If you select specific groups, you will be asked to specify which groups to grant access to HealthSmart.
- Once confirmed, click Finish.

Step 3: Confirm the Install and Submit Form
- Complete our Integration Setup Form to let us know the Add-On has been installed and to initiate the data sync between Google Classroom and your HealthSmart subscription.
- Once we receive your form submission, ETR will send an email notifying you that the HealthSmart setup is complete and to test the integration before sharing with educators.
Step 4: Test the Integration
- Please test access to the HealthSmart Add-On Integration with a teacher account.
- Log in to a teacher account that has access to the HealthSmart Add-On. Select a course, go to the Coursework tab, then click the + Create button and start a new assignment.
- On the Assignment page, HealthSmart will appear under Add-ons (see example below).
- Clicking on the HealthSmart Add-On opens a window to the program. Click on View Lessons to start on the welcome page under Lessons. The lower part of the page shows the grade levels of HealthSmart that are included in your subscription.


Final Confirmation: Congratulations, you’re all set! Please contact ETR Support for any questions or concerns related to your integration setup with Google Classroom.
📑Notes:
- The HealthSmart integration for Google Classroom is configured for teachers only.
- Students can only access content assigned by a teacher.
- District/school administrators or other staff will need a course in Google Classroom to access the program. Alternatively, admin access to HealthSmart can be created without the need for a course in Google Classroom. To request this option, please contact ETR Support.
Additional Content Control Settings
HealthSmart allows school districts the autonomy for local decision-making to ensure all lessons align to state and local policies. A district administrator can be assigned content control settings to select the lessons they want educators to use while opting out of any lessons that don’t fit their scope and sequence.
To use content control settings, a district administrator can be assigned the Lesson Selector Tool which provides a toggle switch to turn on/off lesson access for all educators. See example below:

The Lesson Selector Tool is only enabled by ETR support. To request using the Lesson Selector Tool, please share the name and title of the district administrator during the HealthSmart setup, or submit your request by contacting ETR Support.
📑Note: The district administrator will need teacher permissions in the LMS in order to use the Lesson Selector Tool. Teacher permissions in the LMS are handled by district IT.