The HealthSmart LTI v.1.3 integration with Schoology provides a simple way for students and teachers to access HealthSmart content from within the LMS.
In this article you can find step-by-step instructions on the following topics:
- What You Need To Get Started
- Logging In
- App Install
- Starting HealthSmart
- Accessing Content
- Student Assignments
Watch a video of the HealthSmart Teacher Setup for Schoology:

What You Need To Get Started
- A school/district digital subscription to HealthSmart.
- School/district IT has completed the Schoology integration setup.
Logging In
HealthSmart digital integration with Schoology begins by the teacher logging in to the LMS as they would normally do. The login will appear the same way your district has configured single sign-on or SSO.
App Install
If this is the first time using HealthSmart, the teacher may need to install the app depending on the setup. On the homepage, navigate to the top menu and select the Schoology App Center (waffle icon).

Search for HealthSmart within the list of digital tools in the App Center, then click the HealthSmart app to install to your Schoology account.
📑 Note: once the app has been installed, HealthSmart will be located in your list of digital tools under the course navigation menu.
Starting HealthSmart
The homepage for teachers may look slightly different depending on how your school/district has set up Schoology. Once here, look for the launch link for HealthSmart in the app list on the left-side menu. Clicking on the launch link opens the HealthSmart app.

The HealthSmart welcome screen under Lessons will show the teacher’s name, the district name, and the LMS. The lower part of the screen shows the grade levels of HealthSmart that are included in your subscription. In this example, the school or district has purchased a subscription to middle school. You can also view what’s not included in the subscription.
The teacher clicks the grade level they are teaching to view content. For middle school and high school, the teacher will choose the topic to view the content area.
Accessing Content
In this example, a teacher has chosen the topic, Emotional & Mental Health for middle school.

How to Access HealthSmart Content in Schoology:
Step 1: Select Your Grade Level
-
On the HealthSmart welcome page, you'll see:
-
A welcome message
-
The heading "EXPLORE LESSONS + STANDARDS SUPPORT"
-
Grade level buttons: Grade K, Grade 1, Grade 2
-
-
Click on your specific grade level to:
-
Display all available units and topics for that grade
-
Access the complete curriculum materials
-
Step 2: Choose Your Instructional Topic
-
Browse through the list of available topics
-
Select the specific topic you want to teach
-
This will open the lesson page containing all related materials
-
Step 3: Explore Lesson Components
-
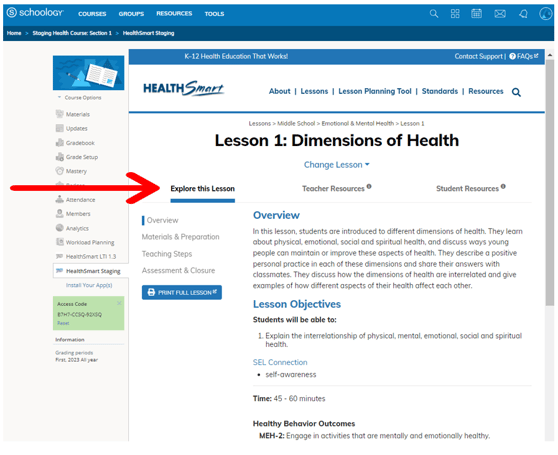
After selecting a lesson, you'll see a page with three tabs:
-
Explore This Lesson: Overview and lesson details
-
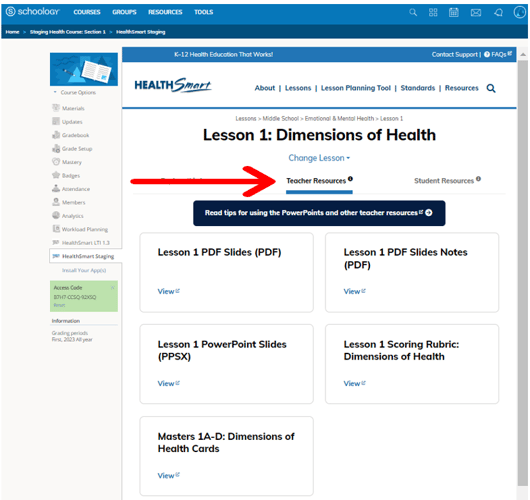
Teacher Resources: All instructional materials for educators
-
Student Resources: Materials to share with your class
-
Explore this Lesson
Once the teacher selects a lesson, they can see all items related to the lesson in the Explore this Lesson tab including the overview, materials and preparation, teaching steps, and assessment. There is also a button that will allow the teacher to print out the full lesson.
Teacher Resources
The Teacher Resources tab includes all the materials for the teacher including slides, teacher keys, masters and scoring rubrics for the lesson.
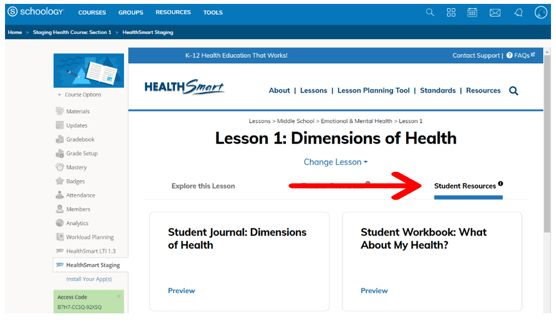
Student Resources
The Student Resources tab includes all the materials students use during the lesson, including assignments and assessments.
Student Assignments
To assign student work, start from the Materials page in the left-side menu within your Schoology course, then select Add Materials and click the HealthSmart link.

Step 1: Access HealthSmart Materials
-
Open your Health 101 Demo: Section 1 course in Schoology.
-
Click on the HealthSmart or HealthSmart LTI 1.3 link in the Materials section.
📌A pop-up window will open, automatically loading your most recently viewed lesson.
Step 2: Select Your Lesson & Resources
-
Grade: Choose the grade level you are teaching.
-
Topic: Select the relevant content area from the list.
-
Lesson: Pick a lesson to view available student resources.
-
Assignments: A list of resources (e.g., journals, worksheets) will appear.
-
Click on a title to assign it to students.
-
-
Language: Choose whether students receive the resource in English, Spanish, or both.
Step 3: Assign & Customize
-
Click the Add Material button to finalize the assignment.
-
The assignment will now appear in your Materials page.
⚠️ Important: Always create assignments through the HealthSmart pop-up. Manually created assignments won’t sync with the LMS.
Grading Assignments
Grade Settings
To enable grading, click the Wheel Icon on an assignment and select Edit from the menu.

Adjust Settings
-
Locate the assignment in Materials and click the Wheel Icon (⚙️) to:
-
Enable grading, set a due date, modify the title, or make it available to students.
-
📑 Note: These settings are controlled by Schoology, not HealthSmart.
💡Tip: if you are using a shell or template course, remember to follow the steps above to enable grading in the live course so that assignments appear in the LMS gradebook.
Grading
To start grading, click on the title of an assignment.

Accessing Submissions
-
Open the Assignment – Click on the assignment to view the HealthSmart grading page, which lists all student submissions.
-
Filter & Search – Use the options to filter by:
-
Student name (first/last)
-
Progress status
-
Completion date
-
Or search for a specific student.
-
Reviewing & Grading
-
View a Submission – Click the blue "View" icon next to a student’s name to open their work.
-
📑 Missing students? If a name doesn’t appear, they haven’t started or submitted the assignment yet.
-
-
Enter a Grade
-
The default point value is 100 (adjustable).
-
Type in a numerical score (e.g., 95).
-
Add an optional comment for feedback.
-
Click:
-
"Save Grade" → Syncs to the LMS gradebook.
-
"Save & Next" → Saves and moves to the next student.
-
-
📑 Missing students? If a name doesn’t appear, they haven’t started or submitted the assignment yet.
Finalizing Grades
-
Verify LMS Sync – After grading, HealthSmart will display:
-
Recorded grades
-
Comments (if added)
-
All updates sync automatically to the Schoology gradebook.
-
Student View

Accessing Assignments
-
Students log in to Schoology and navigate to their course.
-
All assignments are listed under the Materials page.
-
Students click on the assignment title (e.g., "Student Journal: Dimensions of Health") to open it.
2. Working on Assignments
-
Assignments can be completed directly in the window.
-
Autosave tracks progress—students can exit and return later.
-
A "Progress saved. Not submitted." message confirms their draft is saved.
3. Submitting Assignments
-
When finished, students click "Submit Assignment."
-
A pop-up confirms: "The assignment was successfully submitted."
4. Viewing or Editing Submissions
-
To review a completed assignment, students return to Materials and click the assignment title.
-
If edits are needed, the "Resubmit Assignment" button allows changes.