The following configuration guidelines are intended to be used by district IT. Please schedule a 15-minute call with us to confirm the integration setup and initiate the data sync. To schedule the setup call, please contact support@etr.org.
In this article you can find step-by-step instructions.
- What You Need To Get Started
- Step 1: Developer Keys
- Step 2: Client ID
- Step 3: App Install
- Step 4: Testing the Integration
- Step 5: Enable Grading
- Additional Content Control Settings
What You Need To Get Started
- A school/district digital subscription to HealthSmart.
- School/district IT has scheduled an integration setup call with ETR.
📑Notes:
- The HealthSmart app is configured only for users with either a teacher or a student role in the LMS. Other roles in the LMS, such as an administrator or a student with teacher permissions, will not have access.
- If a district administrator tries to open the HealthSmart app, they may not have access and will see an error message. District IT will need to check that the administrator has a teacher role in the LMS, then HealthSmart will work correctly.
- The HealthSmart app is typically configured to NOT be accessible to students in their course navigation; students only access content assigned by the teacher.
Step 1 - Developer Keys
Navigate to Admin / Developer Keys and select + Developer Key, + LTI Key buttons.

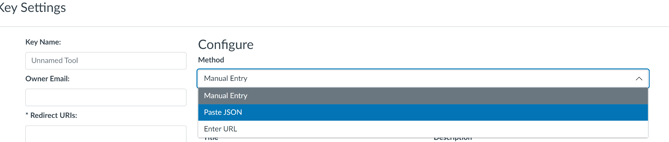
{

"title": "HealthSmart",

"scopes": [

"https://purl.imsglobal.org/spec/lti-ags/scope/lineitem",

"https://purl.imsglobal.org/spec/lti-ags/scope/score",

"https://purl.imsglobal.org/spec/lti-nrps/scope/contextmembership.readonly",

"https://purl.imsglobal.org/spec/lti-ags/scope/result.readonly",

"https://purl.imsglobal.org/spec/lti-ags/scope/lineitem.readonly"

],

"extensions": [

{

"platform": "canvas.instructure.com",

"settings": {

"platform": "canvas.instructure.com",

"placements": [

{

"placement": "course_navigation",

"message_type": "LtiResourceLinkRequest"

},

{

"placement": "assignment_selection",

"message_type": "LtiDeepLinkingRequest",

"selection_width": 1200,

"selection_height": 800

}

]

},

"privacy_level": "anonymous"

}

],

"public_jwk_url": "https://www.healthsmartk12.org/apiv1/lti/oauth/jwks/?keyCode=LTI1p3ETR",

"description": "Where Good Health Starts\nHealthSmart is ETR's skills-based K–12 health education program for classroom and virtual instruction.",

"custom_fields": {

"name": "$Person.name.full",

"email": "$Person.email.primary",

"given_name": "$Person.name.given",

"family_name": "$Person.name.family",

"names": "$com.instructure.User.sectionNames",

"section_ids": "$Canvas.course.sectionIds",

"assignment_id": "$Canvas.assignment.id"

},

"target_link_uri": "https://www.healthsmartk12.org/Slatwall/",

"oidc_initiation_url": "https://www.healthsmartk12.org/apiv1/lti/oauth/loginv1p3"

}
Example:

Please click Save.
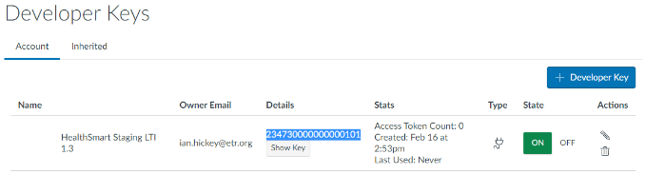
Step 2 - Client ID & Secret
Back under Developer Keys, find the HealthSmart LTI integration and click the toggle switch to on (green).

Please make a note of the Client ID and Client Secret.
❗Important: both the Client ID and Client Secret (Key) will need to be shared during the tech setup call with ETR.
The Client ID is found here (highlighted in blue):
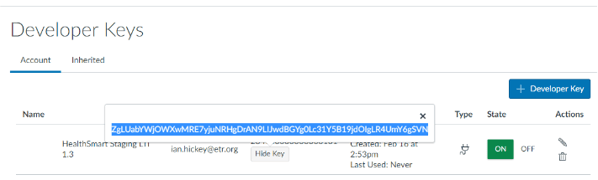
Clicking “Show Key“ displays the client secret.
Copy the developer key from the details column (the Client ID), then add the app by clicking +App at either the Account, Sub-Account, or Course level (more details in Step 3 below).
When installing the app, change the configuration type to By Client ID, add the Client ID, and click Submit.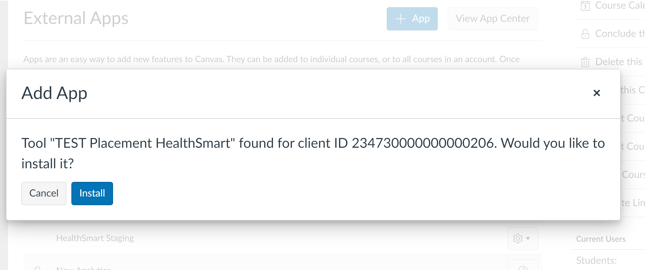
Step 3 - App Install
Choose a location to install the HealthSmart tool as an external app. This can be done at either the Account, Sub-Account, or Course level.
💡Tip: Carefully consider where the tool should be installed. Typically, all users (teachers and students) who are enrolled in an account, sub-account, or a course will be able to access the HealthSmart app.
Account Level

To install an LTI 1.3 tool at the account level, follow these steps:
- As an Admin, navigate to the Account: Log in to Canvas as an Administrator and click on the account name where you want to install the tool.
- Go to Settings: Click on "Settings" in the account menu.
- Choose Apps: Click on the "Apps" tab to view available apps.
- Find the App: HealthSmart is a custom integration, so choose "View App Configurations" and then "+ App."
- Configure the App: Click on "Configuration Type" then choose "Client ID". Use the Client ID to the HealthSmart app installed previously.
- Install the App: Follow the on-screen instructions to complete the installation.
More information can be found on the Canvas Learning Community here: https://community.canvaslms.com/t5/Admin-Guide/How-do-I-use-the-Edu-App-Center-in-an-account/ta-p/262

Sub-Account Level

To install an LTI 1.3 tool at the sub-account level, follow these steps:
- As an Admin, navigate to the Sub-Account: Log in to Canvas as an Administrator and navigate to an account, click "Sub-Accounts" from the navigation, then select the sub-account where you want to install the tool.
- Go to Settings: Click on "Settings" in the sub-account menu.
- Choose Apps: Click on the "Apps" tab to view available apps.
- Find the App: HealthSmart is a custom integration, so choose "View App Configurations" and then "+ App."
- Configure the App: Click on "Configuration Type" then choose "Client ID". Use the Client ID to the HealthSmart app installed previously.
- Install the App: Follow the on-screen instructions to complete the installation.
More information can be found on the Canvas Learning Community here: https://community.canvaslms.com/t5/Admin-Guide/How-do-I-use-the-Edu-App-Center-in-an-account/ta-p/262
Course Level

- As an Admin, navigate to the Account and/or Sub-Account: Log in to Canvas as an Administrator and navigate to the account and/or Sub-Account.
- Go to Courses: Click on "Courses" in the account menu.
- Select a Course: Find a course and click the cog icon to open the course settings.
- Find the App: HealthSmart is a custom integration, so choose "View App Configurations" and then "+ App."
- Configure the App: Click on "Configuration Type" then choose "Client ID". Use the Client ID to the HealthSmart app installed previously.
- Install the App: To ensure the tool is only available at the course level, double check the tool is not installed at the account or sub-account level. More information can be found on the Canvas Learning Community here: https://community.canvaslms.com/t5/Admin-Guide/How-do-I-use-the-Canvas-App-Center-in-an-account/ta-p/262
💡Tip: Admin can remove the HealthSmart tool in Canvas at anytime by going to the location where it was installed (account, sub-account, or course) click on the "Apps" tab, then select the cog icon to open the tool's settings and click "Delete".
Step 4 - Testing the Integration
Once installed, HealthSmart should now appear in the course navigation. The integration can be tested using a Teacher account. Depending on how the district installs the app, teachers may need to add HealthSmart to their course navigation, instructions can be found in the Teacher Guide: How to use HealthSmart with Canvas. When a teacher launches HealthSmart using the link in the navigation, they should be greeted with a welcome page:

Optional Step:
To create an Icon/Logo, please download the file:
![]()
Step 5 - Enable Grading
Choose the grading method to be enabled on the HealthSmart integration with Canvas:
Option 1: Default HealthSmart grading (% scores sync to the Canvas gradebook)
Option 2: Canvas SpeedGrader (requires additional API integration)
Note: The HealthSmart integration does not support multiple grading methods.
❗Important: It is recommended to pick one grading method for the duration of the integration. If a district wants to switch from one grading method to the other, contact ETR to help make this change by emailing support@etr.org.
Please note that after making the switch, any submitted scores on student assignments under the previous grading method will no longer be editable.
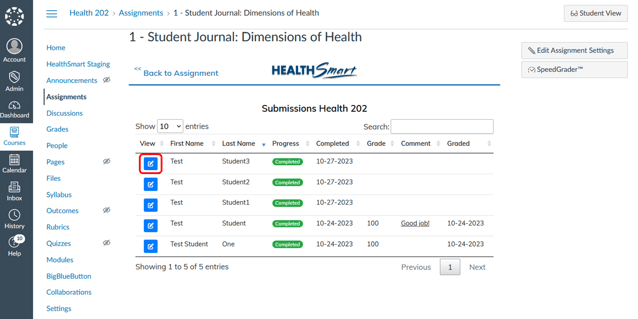
Option 1 - Default HealthSmart
The default HealthSmart grading does not require additional setup in the LMS. Teachers will simply select an assignment, then click the blue View icon next to a student's name to review and grade their work. Once the grade is submitted, the % score will be recorded in the LMS gradebook. More information can be found in the how-to article, Teacher Guide: How to use HealthSmart with Canvas - Grading.
Option 2 - Canvas SpeedGrader
To enable Canvas SpeedGrader for HealthSmart, an API integration is required in addition to the LTI integration.
Step 1:
Navigate to Admin / Developer Keys. Click the + Developer Key button and select + API Key.

Click the Save button.

Step 2
Back under Developer Keys, find the HealthSmart Student API integration and click the toggle switch to on (green). Both integrations need to be enabled in order for the program to run correctly.

Please make a note of the Client ID and Client Secret (Key) to HealthSmart Student.
❗Important: the Client ID, Client Secret (Key) and the district's custom domain for Canvas will need to be shared during the tech setup call with ETR.
The Client ID is found here (highlighted in blue):

Clicking “Show Key“ displays the client secret.

Optional Step 3 (if an existing customer switching over to SpeedGrader)
In Developer Keys, find the original HealthSmart Developer Key, and click to edit. Locate the Target Link URI and change this value from https://www.etr.org to https://www.healthsmartk12.org/
Additional Content Control Settings
HealthSmart allows school districts the autonomy for local decision-making to ensure all lessons align to state and local policies. A district administrator can be assigned content control settings to select the lessons they want educators to use while opting out of any lessons that don’t fit their scope and sequence.
To use content control settings, a district administrator can be assigned the Lesson Selector Tool which provides a toggle switch to turn on/off lesson access for all educators. See example below:

The Lesson Selector Tool is only enabled by ETR support. To request using the Lesson Selector Tool, please share the name and title of the district administrator during the HealthSmart setup call, or submit your request to support@etr.org.
📑Note: The district administrator will need teacher permissions in the LMS in order to use the Lesson Selector Tool. Teacher permissions in the LMS are handled by district IT.